
That’s Dredd 6 parter finished! Hurrah!
And some art for a pitch thing! Hurrah!
Now just a five part 20 pages thing to finish, a seven page thing I promised someone ages ago, and uhm… I think I was doing inktober.
Notes from the drawing board

That’s Dredd 6 parter finished! Hurrah!
And some art for a pitch thing! Hurrah!
Now just a five part 20 pages thing to finish, a seven page thing I promised someone ages ago, and uhm… I think I was doing inktober.
Owing to severe weather conditions, this week’s comic class in Dublin has been cancelled. I’d intended to get everyone inking some blue line art. So instead, I’ll talk about inking here.
There’s a few terms you’ll need to know:
Spotting Blacks – this is the process where-in you decided where to place black ink on the page. Spotting blacks well can make a page pop, steer the readers eyes and make the page finished.
If you’re unsure about where to spot blacks on the page, best thing to do is grab a big fat marker and spot some blacks on a reduced photocopy of the art.
BWS – Black With Stars – a pencilled instruction, indicating to the inker that you want Black – WITH STARS. Stars are often done with white ink on black – and, unless there’s a very specific look you’re after, it’s far easier to leave that to the inker (I’ve seen some pencillers who will ink certain bits of the stars they want because they’re after a specific thing).
X – X marks the spot. To be filled with black ink. and X in a bit of open pencils usually indicates the penciller wants that area to be filled with ink.
Dead line – no, not that one. A dead line in inking is a line that’s got not variety of thickness. Dead lines tend to look lifeless and flat (hence ‘dead’) and are to be avoided on anything really.
Tools:
Nib Pens – There’s a whole bunch of nibs worth picking up, and an inkers arsenal will often have a variety of sizes and “bounce”. Nibs can be stiff, or soft, and this will fall down to your preference. The most common nibs are:
Kuratake G Nib – A stiff nib for general line inking.
Hunt 102 – A fine lined, stiff nib – good for detail.
Hunt 107 – a fine lined, soft nib – good for detail. Pick one based on your preference.
A good inker can ink with pretty much anything, and each tool will do something different, but these are a fine set of nibs to start from. Here’s a decent set (ask for it for xmas! http://amzn.to/2ykKOXz )
A new nib will need cleaned (it’s covered in a protective film) either wash it with warm soapy water and dry thoroughly, or burn it off with a lighter (just a quick swipe with the flame should do it).
If you don’t, it’ll likely work fine, but it may take a little while to settle down.
You’ll also need to buy a pen holder.
Brushes – best advice on brush inking is to buy a variety of tools and try them all. Some people will be comfortable with a thicker brush and some with a thinner. The brush offers the best of all inking tools, but can be a devil to get right.
It can make even the dullest straight line look organic and attractive.
Here’s a video I made on using a ruler with a brush or a nib to rule a straight line (it’s a surprisingly uncommon bit of knowledge)
https://www.youtube.com/watch?v=WftBA4BbaSM
Brush use:
The brush has a number of component parts: The tip, the body, the ferrule (the metal bit joining the brush to the handle) and the handle.
When inking, avoid getting ink near the ferrule – anything there can dry and harden and ruin the brush (never through away a ruined brush as you can still use it to get some interesting textures)
Wash the brush frequently in clean water. I dry it by twisting the whole brush as I draw it down over some tissue (kitchen roll is best)
This is one of my favourite brushes (amazon has it a bit pricey, you can buy these cheaper locally, I’m sure) http://amzn.to/2ylB1jV
But more brush artists prefer a larger brush like this Winsor and Netown Sable Brush http://amzn.to/2ynvGpL
Nibs and brushes though often considered the best option, aren’t the only thing, there’s a lot of great pens available – where you can you want to stick to something water and light resistent, I’ve used some of these in the past:
Zebra Brush Pen – one of my favourite inking tools, flexible, always ready, waterproof and apparently lightfast. I’ve used the Medium pen here, and I’ve just ordered a set of various sizes and excited to play with them. http://amzn.to/2ypEqvL
Micron Pigma Pens – these come in a variety of sizes, which is just as well, as unlike brushes (or brush pens) these can only give you a sort of dead-line though you can get a fair amount of variety if you repeatedly go over a line with a pen and introduce different thickness.
Pretty great for drawing background details though where the dead line isn’t always a drawback.
Just be careful to get original micron pens, as there’s a bunch of counterfeit options out there that aren’t as lightfast nor as good. Here’s a full set to play with http://amzn.to/2ypln4B
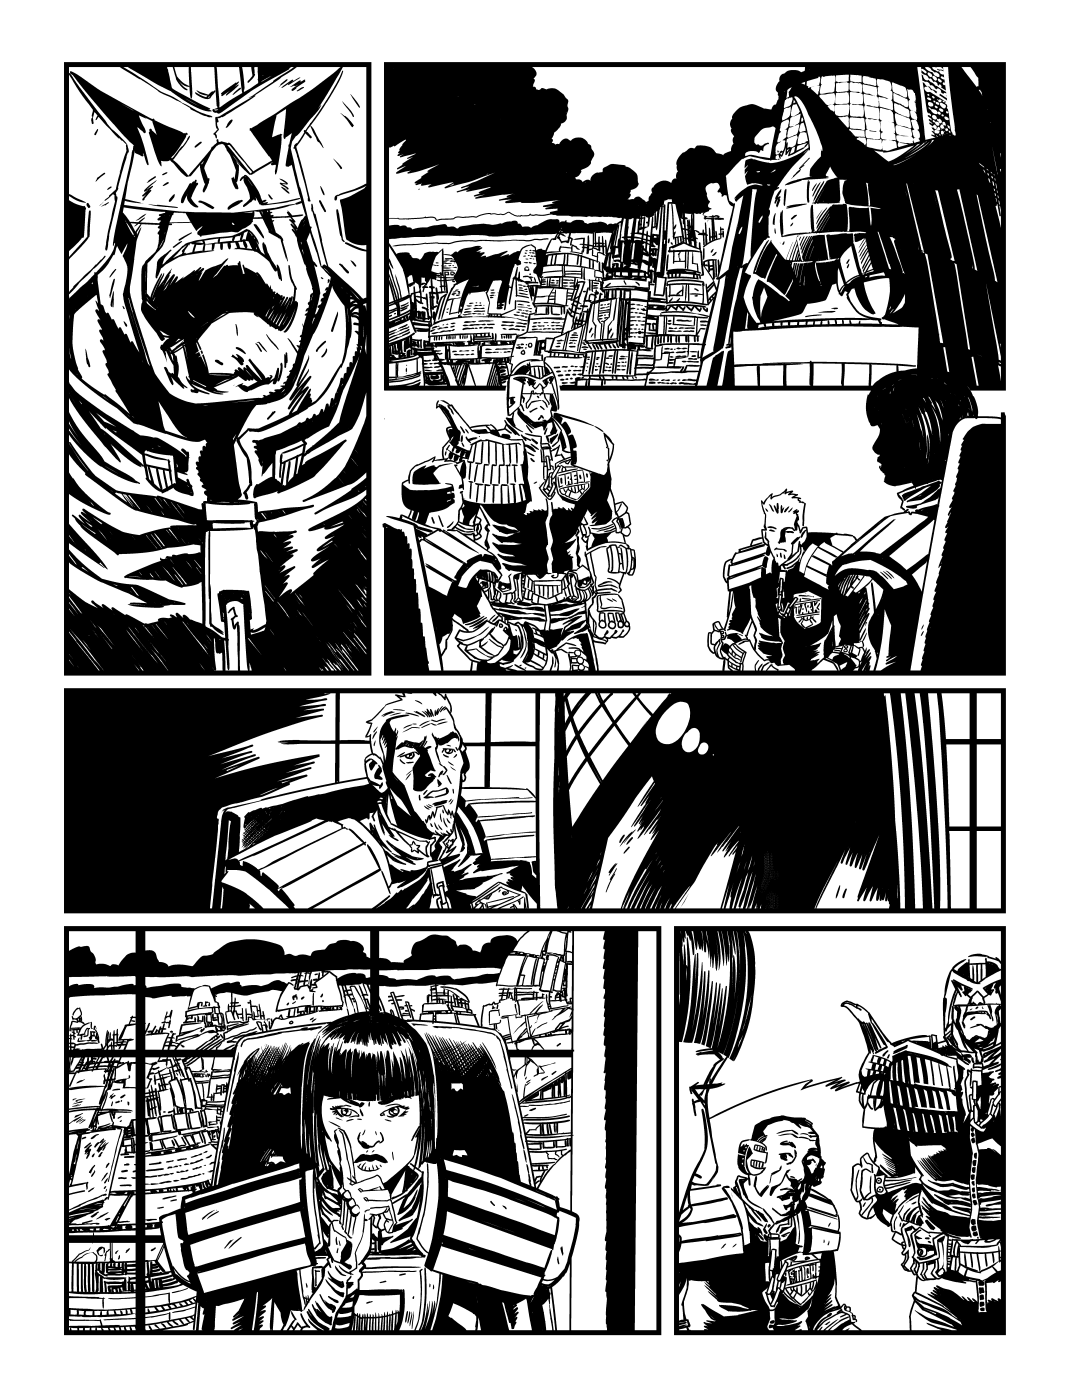
Here’s a few files to play with (from mine and Rob William’s story “Nurture” published by 2000AD.) I’ve given you what the pencils and inks look like as well as blue line versions of the pencils and blue line versions of the inks. If you’re feeling brave, print the pencil bluelines and ink that. If that’s a little daunting (and it is because my pencils are pretty sloppy) then print the blue lined inks and try inking from those. Let me know how you get on!

photoshop/kyle webster brushes
Well, maybe more.
1. Know the horizon line and the eye level. They amount to the same thing, except the horizon line is the furthest point in the distance (where the horizon would be if the world were completely flat and didn’t have mountains/lakes or buildings in the way) and the eye level is a line that runs exactly through the horizon line except it’s where you’ve placed the viewer of your image, so represents as close as you can get to the viewer.
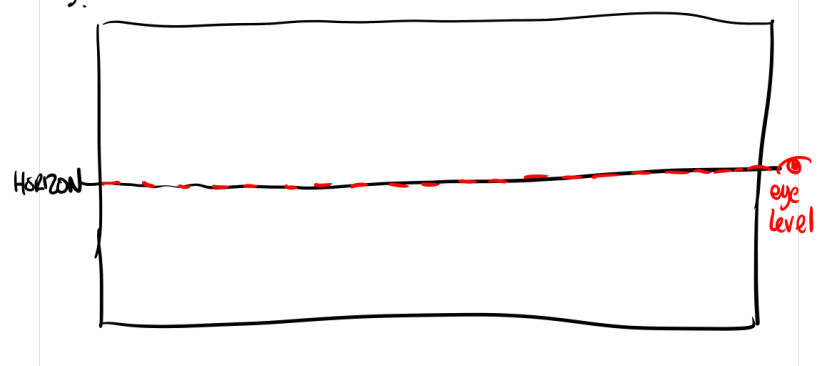
(A wobbly horizon and wobblier eyeline, but just imagine one is going right through the other!)
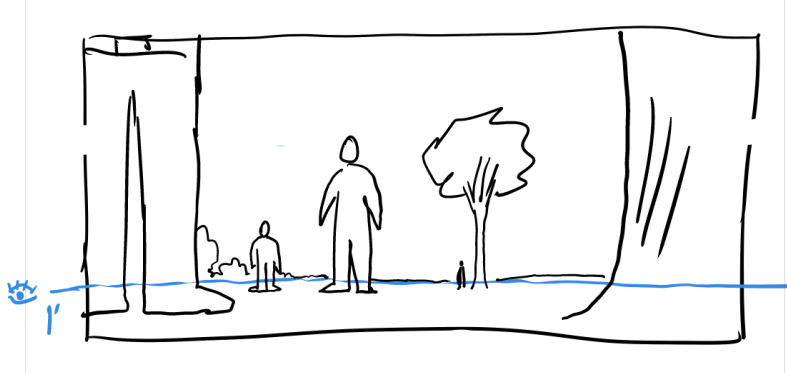
2. Things that are closer to the eye line are larger. Things that are further from the eye line are smaller! (I know, this is remarkable stuff!). When you’re dealing with drawings though, this isn’t quite enough, because, who’s to say that two squares floating in space, one smaller than the other in 2D aren’t just two different sized squares floating side by side? Then you need to bluff.
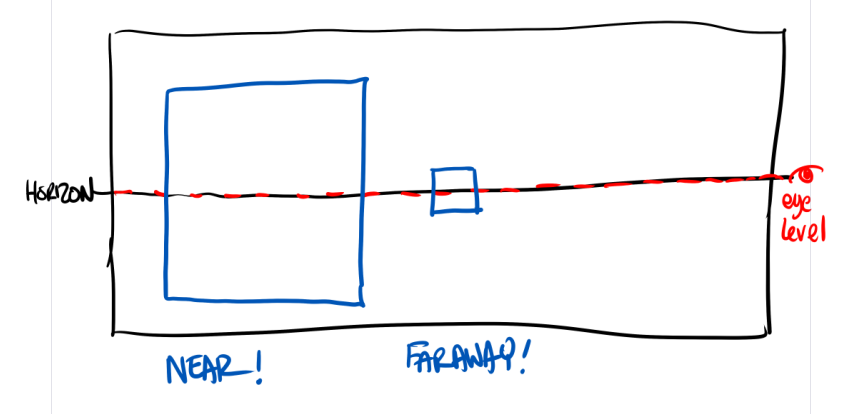
3. Overlapping helps your brain organise which items are in front of and behind other objects. Overlap a large square over a small square and it looks like the small square is much further away (join the squares up at the corner and voila! a cube!)
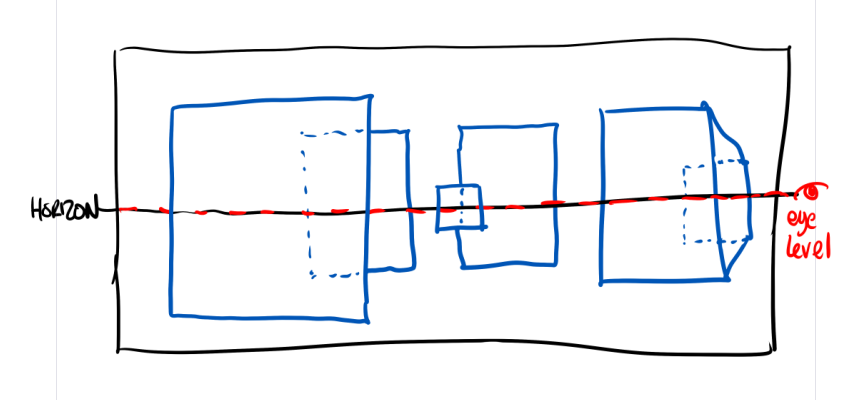
4. Use the eyeline as a way to hang things the same height as the eye line – so if your eyeline is 5’4″ (I’M SHORT – DEAL WITH IT) up then anything that hits that eyeline will appear 5″ 4′. It’s just the way our brains handle it.
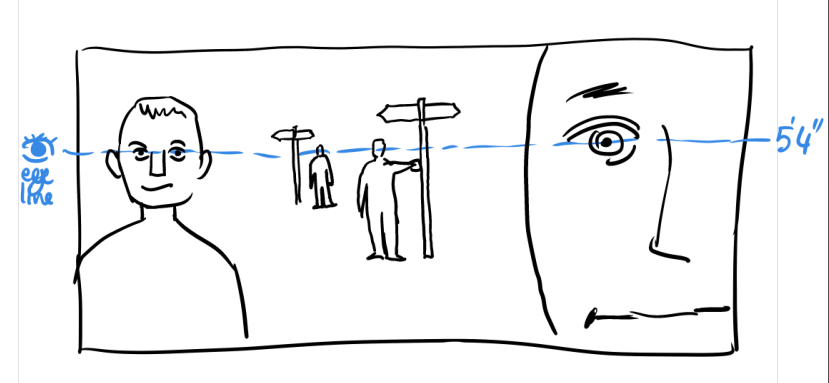
5. If something is taller or shorter than the eye line, figure out where the eyeline would intersect it and place all your objects where on the eyeline where the intersect.
That’s it. You don’t need no steenking vanishing points.
I’m going to be delving into these topics in much more serious depth, BUT only for patreons, I’m afraid. If this is the kind of knowledge you want then sign up for the Backstage pass. I’ve limited numbers of $5 passes so if you’re in early you’re paying half. Otherwise it ten bucks.
I think perspective is a subject that too many people are afraid off because it very quickly becomes an exercise in technical drawing. You’re drawing hundreds of lines for guides before you get to do anything creative. But I’m pretty sure there’s an awful lot of stuff you can do without playing that game. Join me and you’ll see.
Done is better than Perfect.
You hear that a lot in comics.
Done is better than perfect.
It’s like any aphorism, there’s always counter examples:
Done perfectly is better than done. And no-one remembers how long a project takes, only whether it’s any good or not.
But Done Perfectly is hard, and for every project done perfectly there’s a thousand unfinished, not-quite-there projects that are never finished. (and it’s a dead cert that the people making it don’t think it’s done perfectly)
Last year, when I began acting again, I did Macbeth (minor, but fun role) and I thought ‘God, I’d love to do an adaptation of Macbeth – as a grand sweeping sci-fi space opera, but keeping Shakespeare’s dialogue entirely intact’.
A designed a couple of characters – Macbeth, the witches, Duncan – basing it on things I thought would look amazing (touching on Aubrey Beardsley, Kirby, Charles Rennie MacIntosh, and more)
And then… well, I realised it’s gonna be over 300 pages (at least a years worth of work), and may be just out of my grasp artistically and who on earth would pay me to do it?
This month, though, doing one-page-a-day comics (setting a maximum time limit of 45 minutes of so, though I haven’t kept count, so it’s possible I blew that up) I’ve discovered I can draw enjoyable to read and draw comics that don’t require the same time/effort/perfectionism as my day job.
And, as a fun experiment I thought I’d apply that to the first page of the Macbeth strip. And, you know what, it worked. In so much as I got one page finished of a 300 page project that I was never gonna draw.
Will I do more? Maybe. Maybe next month after inktober, if the mood takes me and things settle down (even stealing a one hour out of my day is taking me off things I need to be doing).
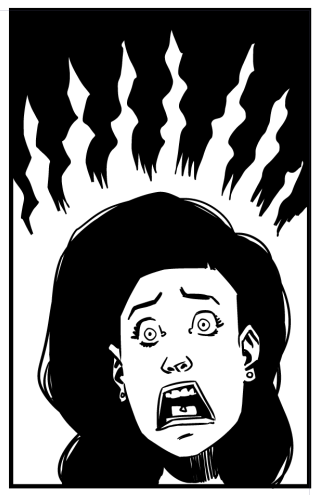
Anyhue, here’s Macbeth, the sci-fi space epic, first page. If I do more it’ll be behind the paywall, because, well, it’s got to be some value for money for people here, right?
Back to the story, after our unscheduled ad break.
(I had intended to properly interrupt the story with the ad, but decided to get back to it. Ad many appear in the back of any print comic…)
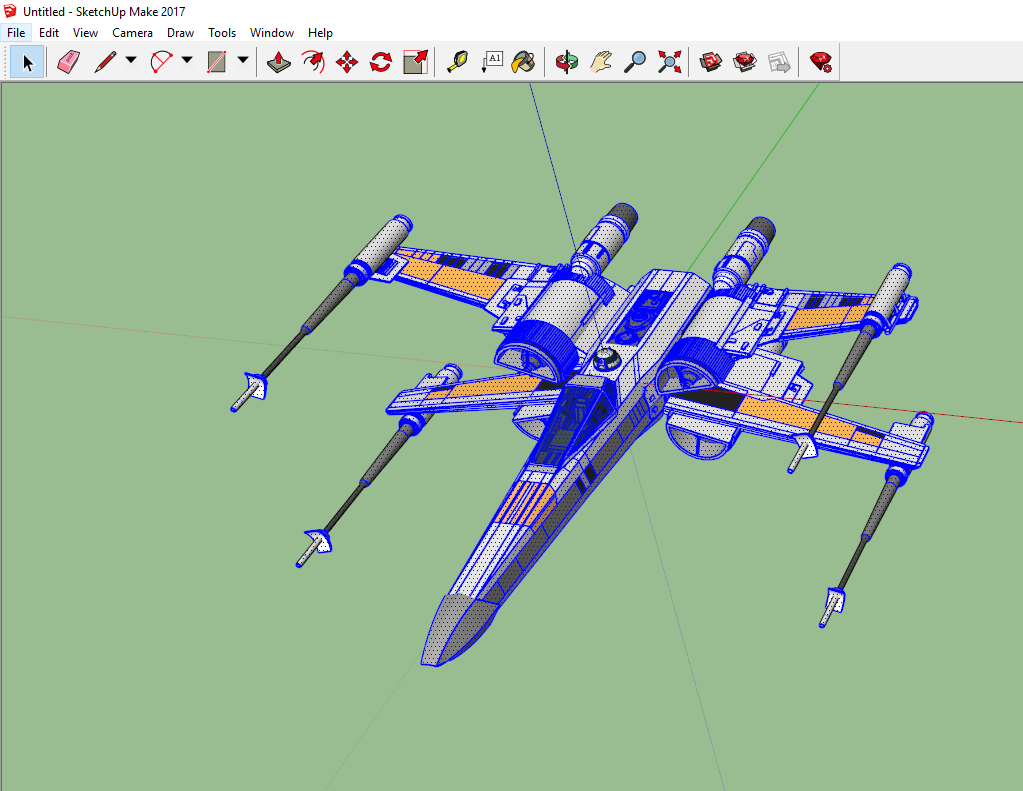
I’ve been doing a lot of 3d stuff of late. Primarily, using freely available sketchup models to place objects then take screen shots which I then drop into clip studio to draw over.
Sketchup is a phenomenal (and free!) tool for this, and has a massive library of prebuilt objects to play with.
And while sketchup’s 3d naviation is pretty good, it’s pretty frustrating to do everything this way.
It’d be better if I could go from the sketchup model straight into Clip Studio Paint, and I’ve finally figured out how to do this accurately.
You’re going to need:
Sketchup (obviously) Clip Studio Paint (d’oh!) and… Blender (WTF!!)
Blender is a free 3d modelling app, which is a little frustrating to work with but I’ll condense some basics for you.
I’m afraid I’m going to have to assume you have some basic skills in sketchup (like moving models, selecting things, etc)
Step 1: Find your 3d Object in sketchup.
Go to File->3d Warehouse->get models. And look for the model you want!
(I’ll wait)
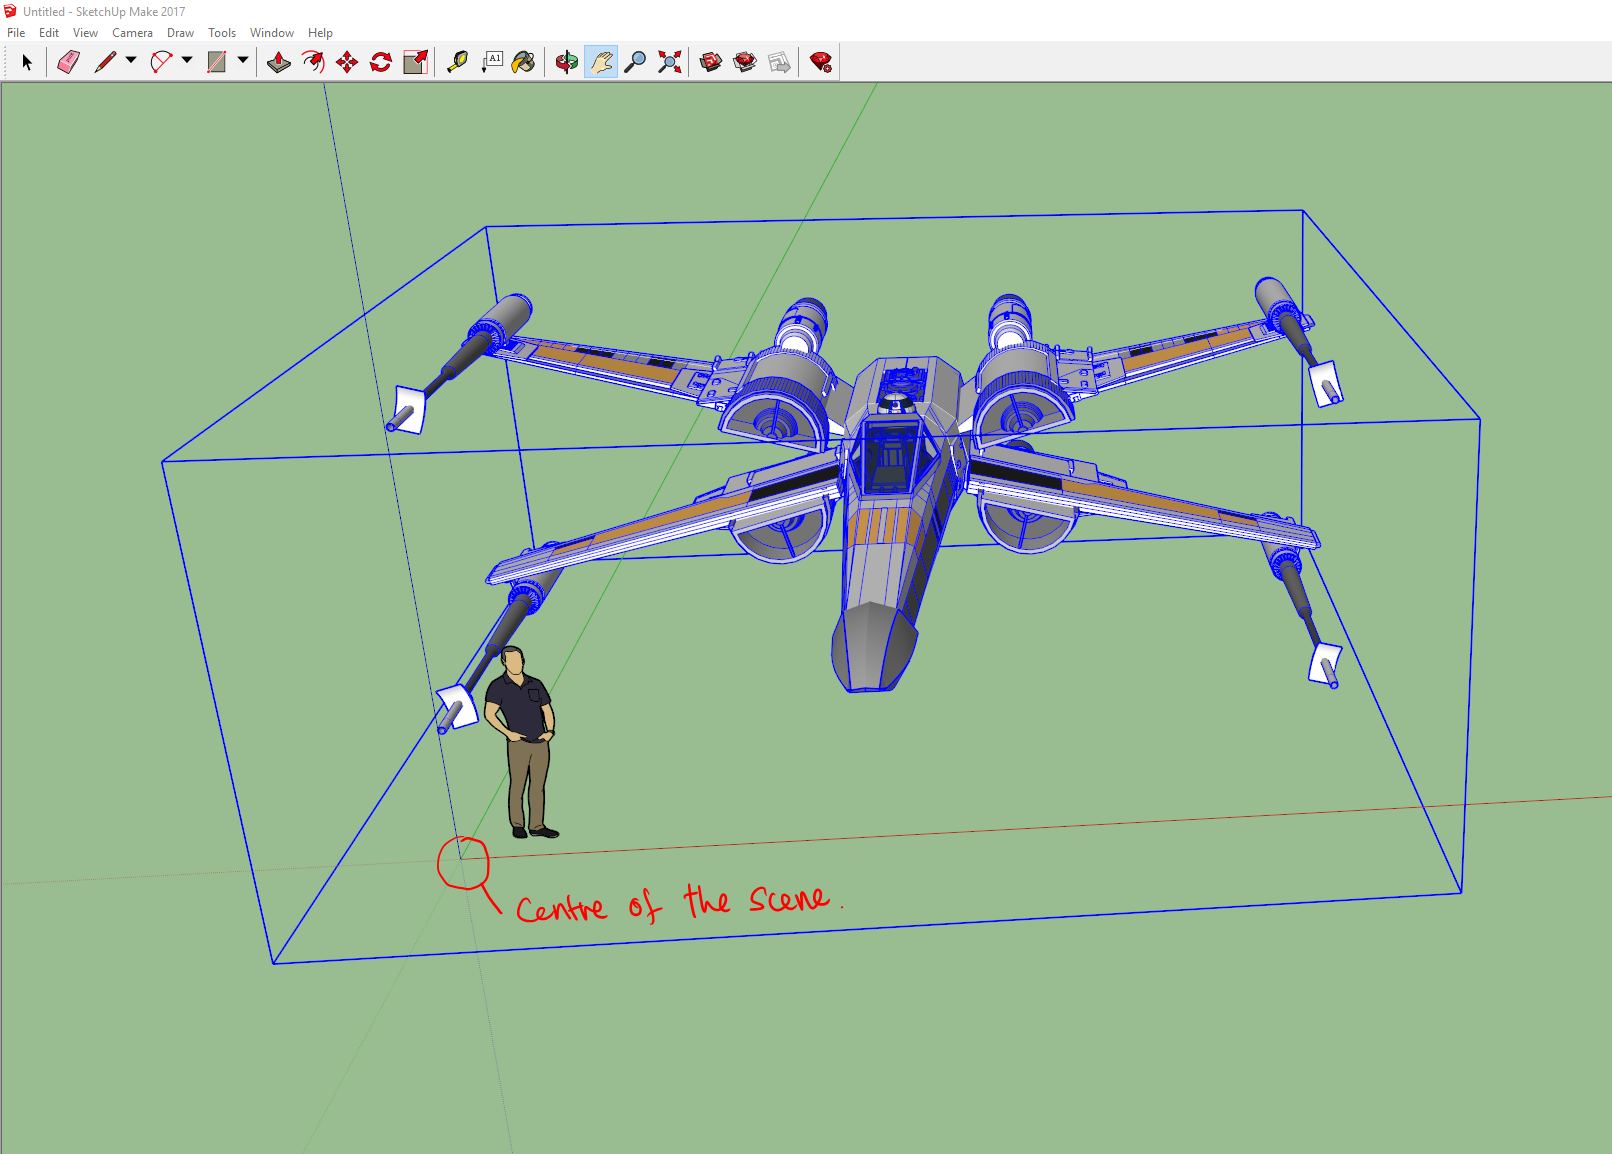
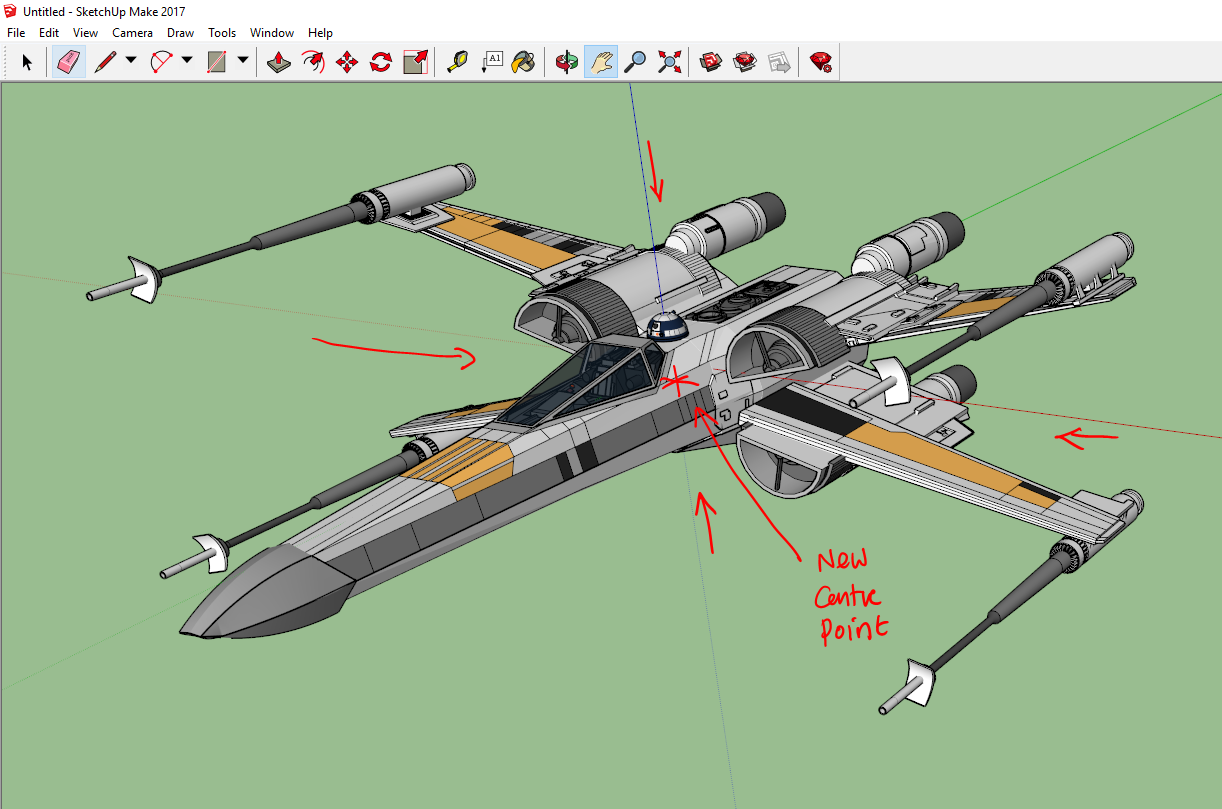
Once you have it, you want to place it in the centre of the sketchup scene (look for the lines and scale it to roughly the accurate size – often some models are either too large or too small) I find the easiest way to make sure you have it roughly the right size is to either eyeball it against the little guy that’s in the default scene or, better, to create a simple cube with the right width/length/height of the object (so if the final object is supposed to be 9′ 6″, I make a cube that height, then scale the object to that size.)
Next, I clean up the scene a little, delete any extra objects I don’t need (and if I have to, edit the model to remove stuff that’s extra/not required) and, importantly, move the centre of the object to match the centre of the scene – this is becomes the objects centre when rotating/etc in Clip Studio, so important to get right here!
Now we have to “explode” the model. Sketchup models are made up of groups of ‘components’ as well as basic primitive shapes. The components are often duplicates of other groups/collections, what this means is that a simple export will frequently not export everything you need. Exploding the object will break the components up in to their simple constituent parts. The thing is you will have explode and explode and explode again, as often there’s a hierarchy to how the model is built. Sounds complex, but it’s pretty simple.
Step 1: Select the model. Hit explode!
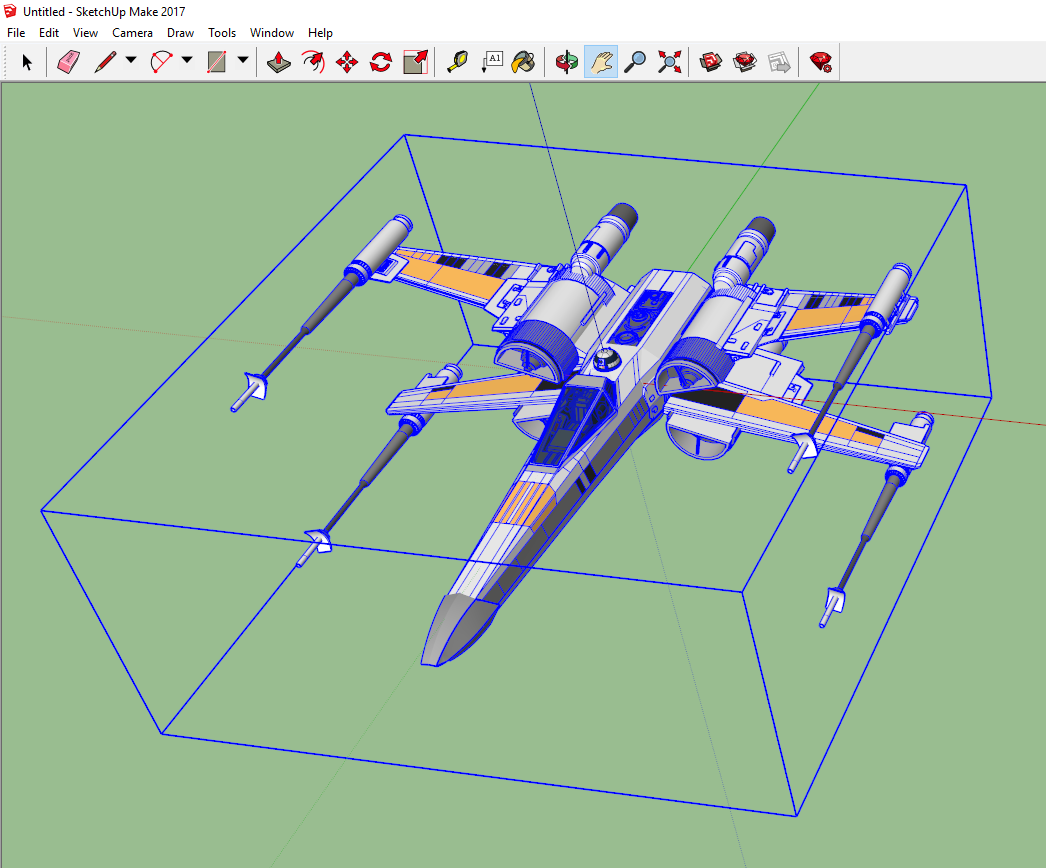
Here we’ve selected it, prior to the first explosion. Once selected, use EDIT->COMPONENTS (1 in model)->Explode
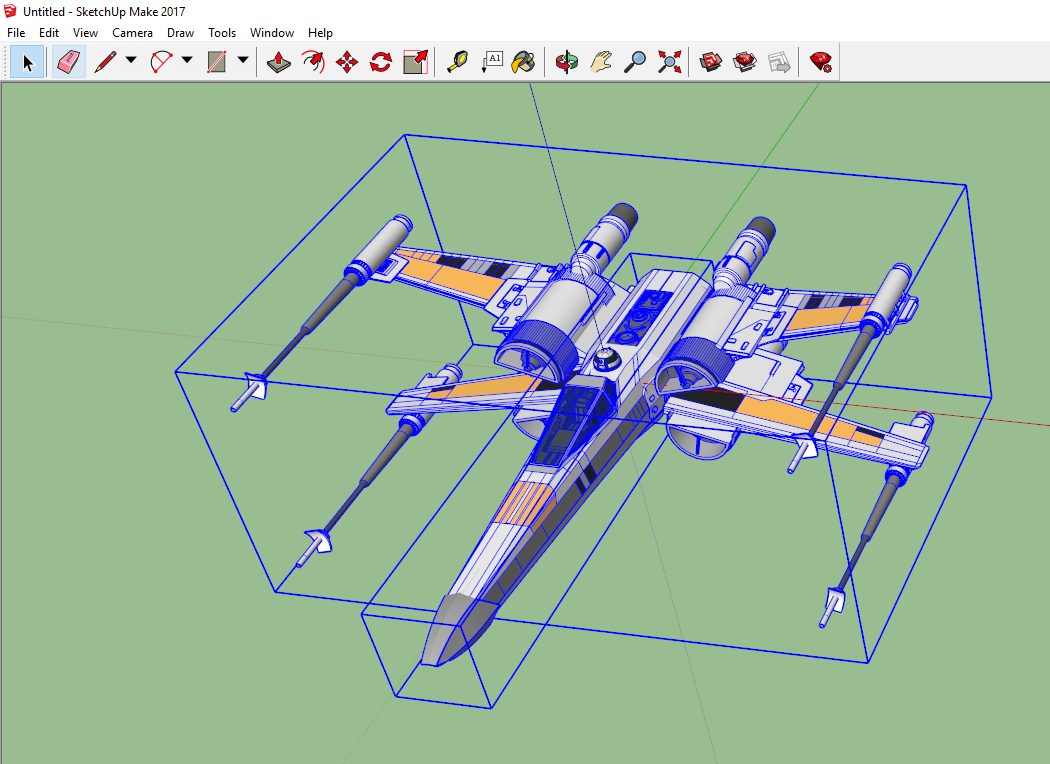
This will start the breaking down process.
Without selecting anything else, repeat
EDIT->COMPONENTS (1 in model)->Explode
(The number ‘1 in model’ will be different depending on your model)
At this point, on this particular model you should start seeing more blue boxes around things. (BTW every model will break down in slightly different ways, and may require more or less steps)
Again don’t select anything – the edit menu might change a little, in this case we’ve broken one component down into two groups, so we select:
EDIT->2 Groups->Explode
(The ‘2 groups’ will have replaced the ‘1 Component’ menu item – and again, this is particular for this model, the wording may be slightly different on your model, but the basic principle remains the same)
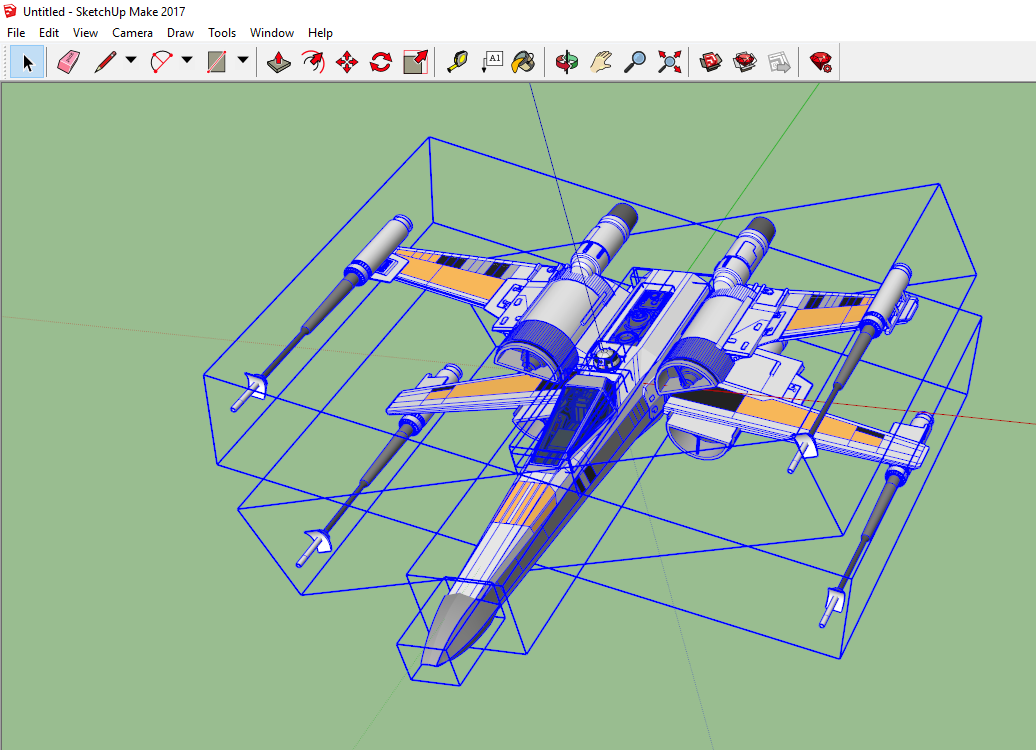
There should be more blue boxes (generally you’ll see blue boxes around groups of objects and blue outlines around components, and blue dots around basic shapes)
We keep repeating the explode process until the menu option greys out the word explode.
If you accidentally deselect anything, the easiest thing to do is to draw a selection box around the entire object, and continue on.
We keep going until we’re unable to explode. And we’re left with nothing but several thousand ‘entities’ (the basic shapes)
Now we can export.
Using file-Export->3d Model…
We export a Collada DAE file (we’ll call this x-wing)
Unfortauntely, this isn’t enough to get us into Clip Studio. Now we need BLENDER!
Start up Blender (assuming you have it, if not – go get it, it’s free)
Blender is a fiercly complex program, luckily we only need to do a few things in it.
Step 1, we’ll delete blender’s default object (a cube) just hit the delete key and click ‘OK’ when asked if you want to delete it.
Step 2, file->import->Collada (DAE) object. And find then select your object you’ve just exported (I apologise for Blender’s weird visual interface, but wasn’t my doing)
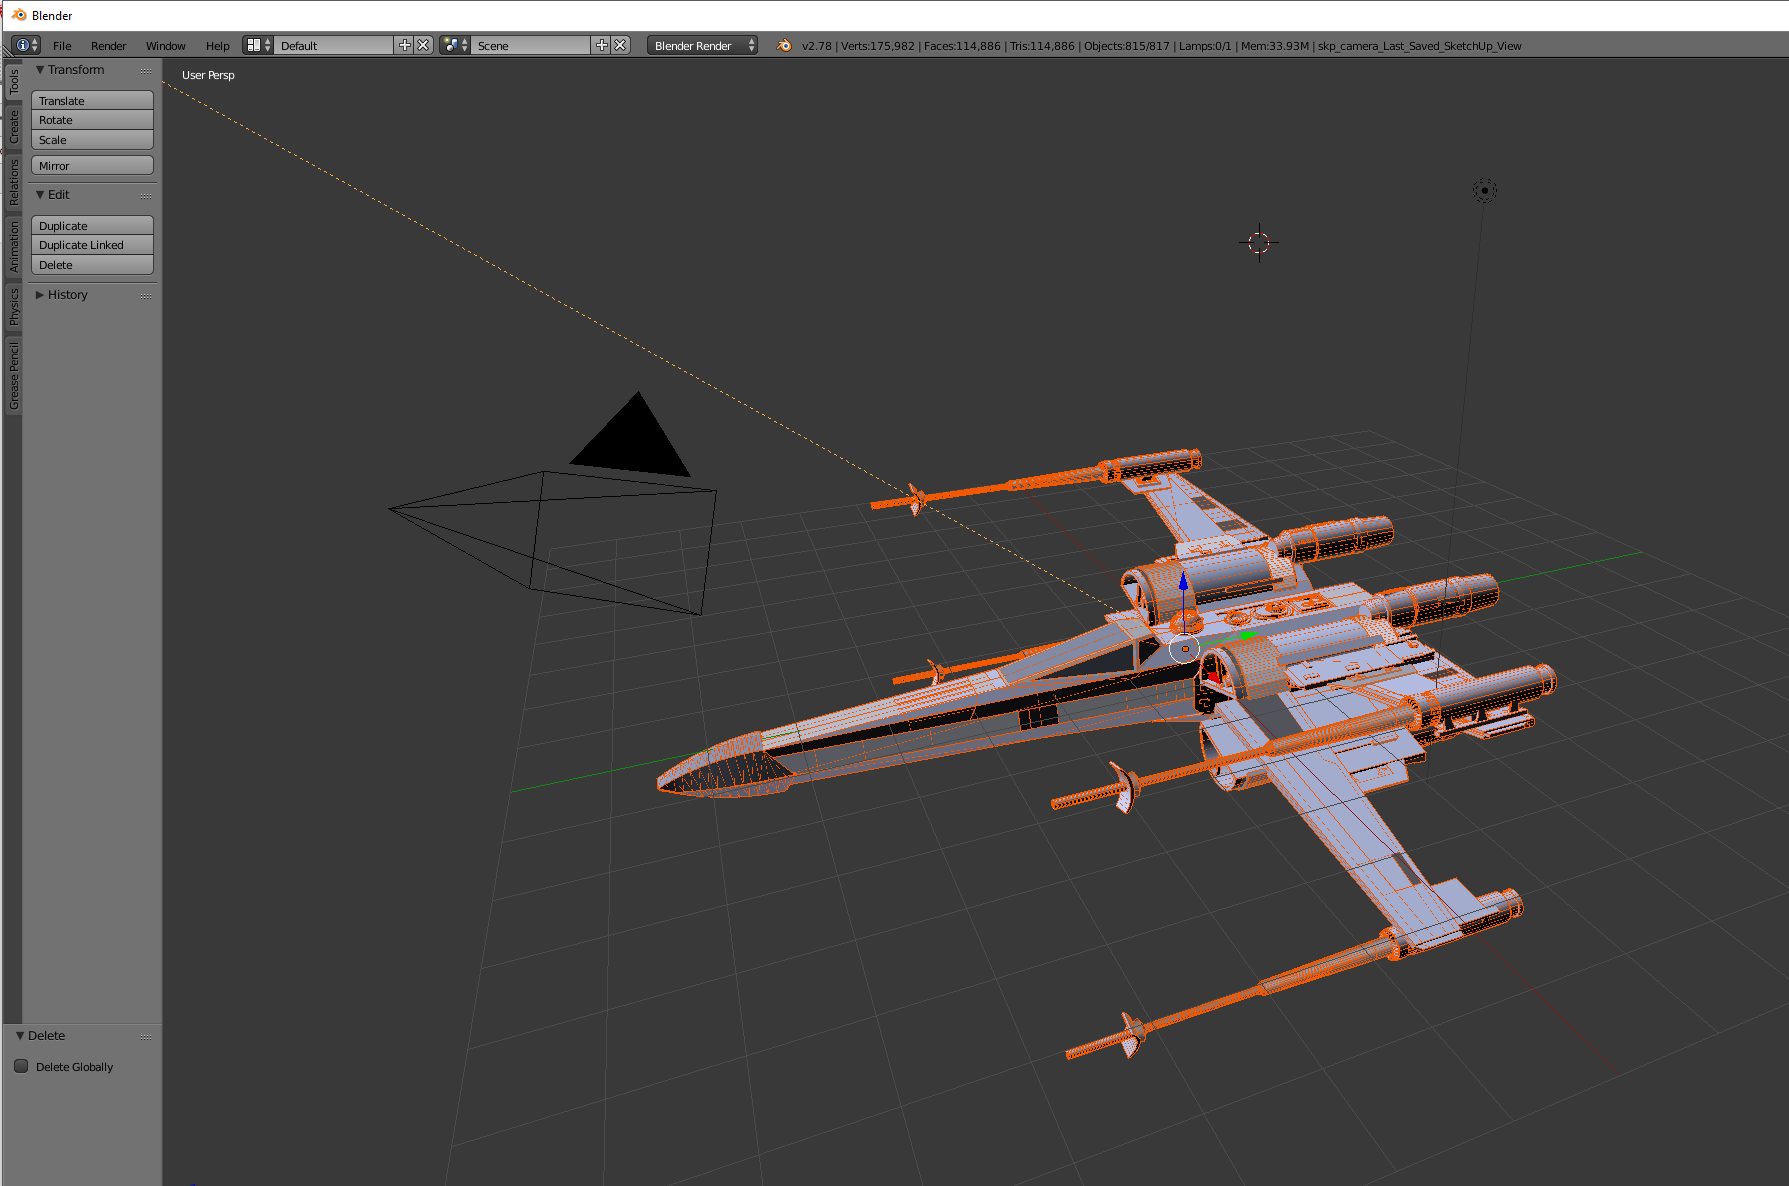
Step 3. File->Export->Wavefront (OBJ) and save it with a sensible name (here I’m going with xwing.obj)
And that’s it! Done with blender! You can now exit that program! (I’m trying to learn it a little, but boy-oh-boy it’s a nightmare!)
And now we can fire up Clip Studio Paint!
Now, getting an OBJ file into Clip Studio Paint is pretty simple matter of dragging and dropping – just find your 3d object and drag it on to a page. For reasons I haven’t figured out, sometimes that just doesn’t work, and you need to use file->import 3d data, but as long as it’s an obj file it should work fine.
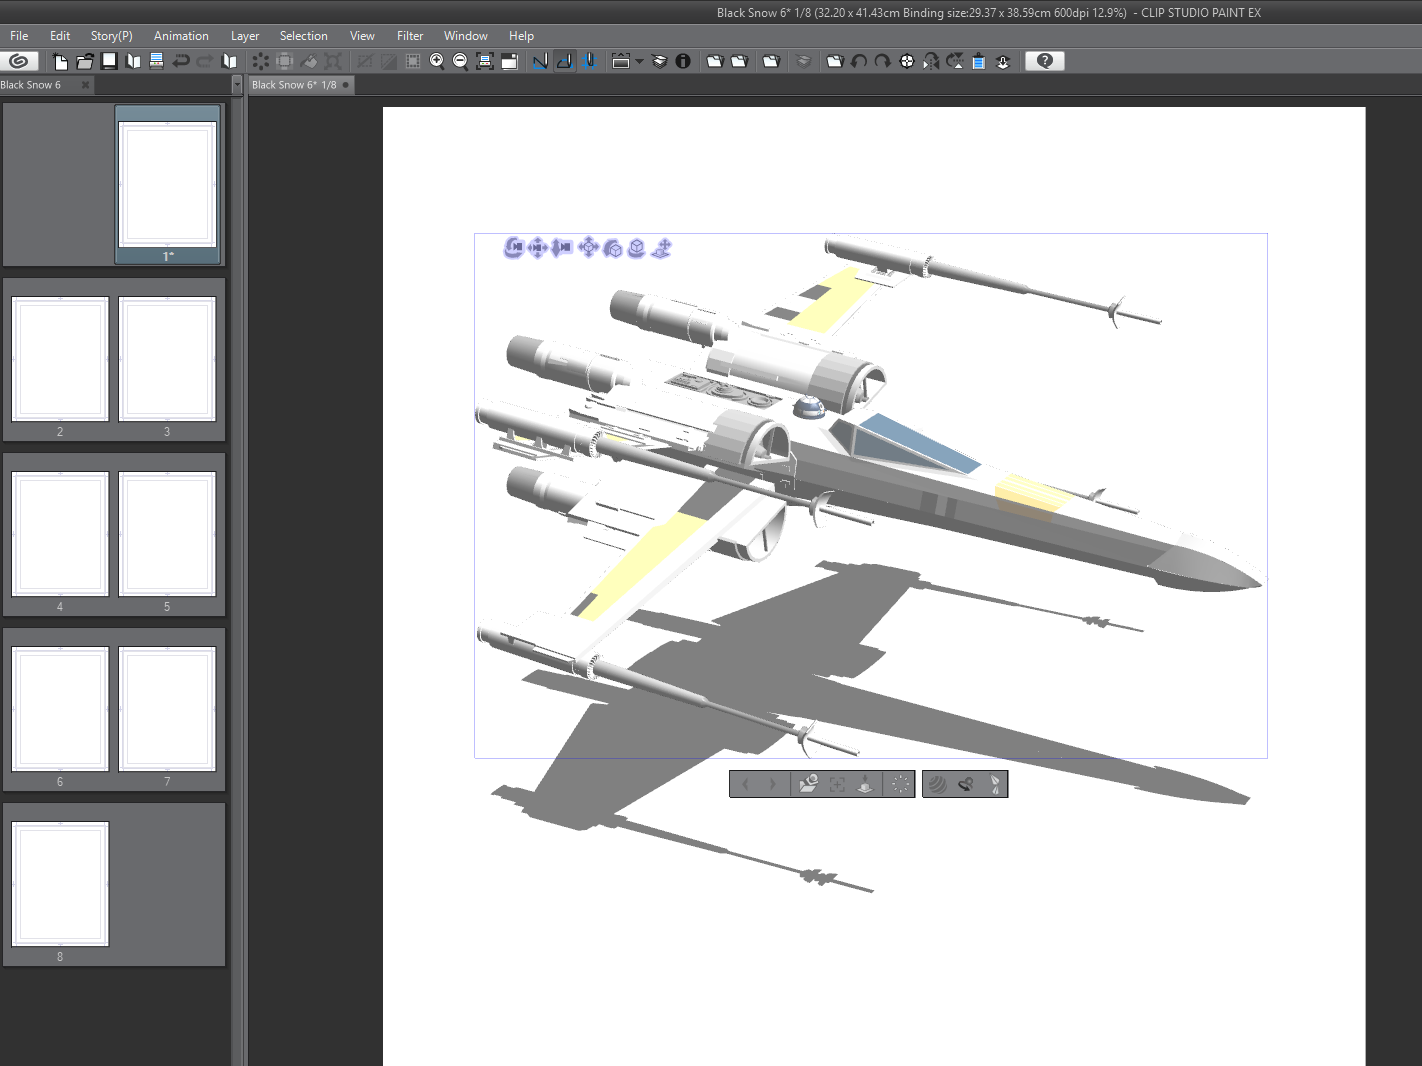
Model in Clip Studio Paint
Now we can either trace over this by hand, or convert it to an LT layer (basically leaving CSP to trace over the model)
I often convert to an LT layer and trace over that by hand, since i find it leaves the 3d model more ‘readable’ (for want of a better word)
(You find the ‘LT Conversion of layer…’ on the layer’s menu on the layer window – lots of options in this, so play around and see – though it can take a few moments to process when doing so)
Here’s the same model converted to an lt layer…
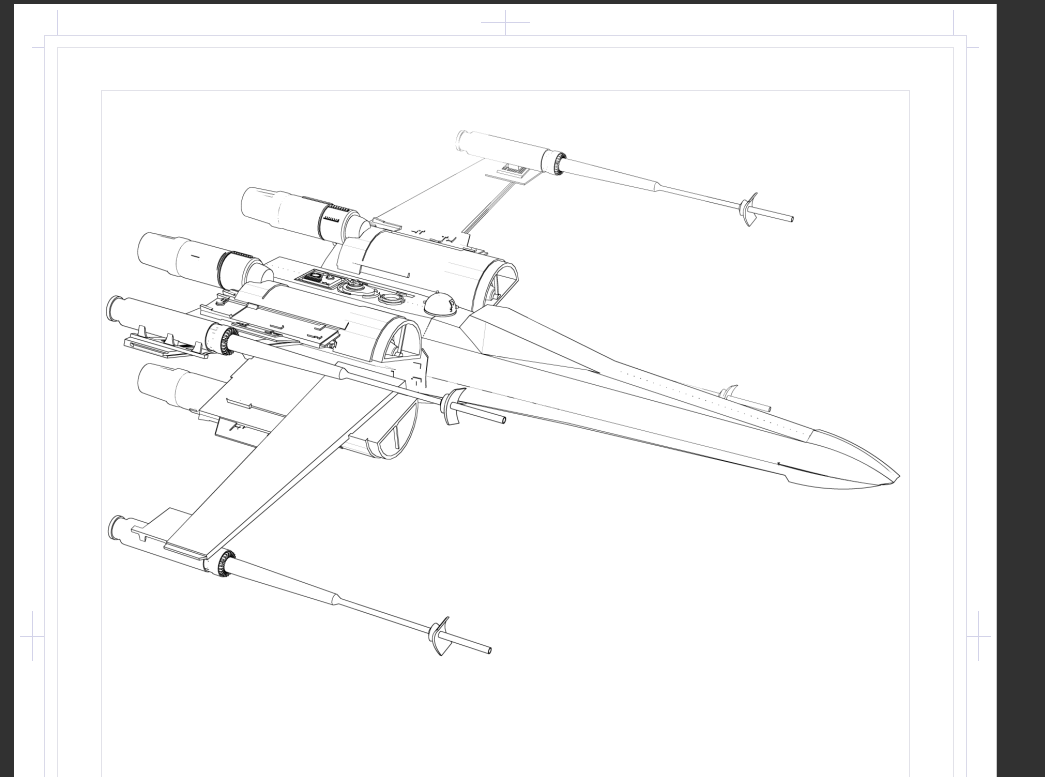
And that’s it. There’s LOTS more to play around with and consider (but they require more in depth knowledge of each package, there’s many great things you can do in blender in particular to help make the objects in CSP a little more readable for tracing over).
This knowledge was pretty hard won (seems simple now, but it really was experimental digging) would appreciate it if you can direct people over to the patreon if they want to see how to do it fully…
Thought I’d take a silly one page detour, to amuse Tom. My kids love that turtle meme. (You’d think it had played out by now, but they love it)
I’m kind of enjoying this one page per day thing. These are taking me between 10-50 minutes. (I hope, I haven’t timed them. I’ll be horrified if they’re taking more than an hour…).
I’ve sort of got an ending for this story, but I’m actually tempted to keep going. Not with this, with something else in November.
The benifit is the pressure is low – I just sit and think of something to do and draw that. It’s a little more pressure a few days in since now you actually have a story and an end point you’ve got to get to, and you can’t quite meander all over.
My plan is to do a simple 28 pages story, with cover and back cover, it means, potentially I have a 32 page comic. Which I’ll self publish and bring to cons etc (but in very limited runs).
I’m trying to think of the best way to give this away online though. My initial plan was just push it twitter (which is satisfying artistically if not financially rewarding) but you guys deserve it exclusively.
New plan might be: one page a day on here (for all paying patreons) then at the weekend I unlock all the pages and send people over to read a week’s worth.
That’s worth considering.
(Course everything will fall apart the moment I have too much work on… which I already do. But this is like a little break from that)
At some point I should investigate comixology for selling digital comics.
My youngest son has been doing his own inktober comic too. It’s been fun sitting with him (and he’s enjoying mine) and I’ve been pushing that on twitter. I’ll maybe link his here to.
Anyway, any thoughts you have on the matter that’d be awesome.
Oh, this Saturday is 24 hour comic book day – but you’re nuts if you think I’m committing to doing one of those.